Chocolate Lava Cake Recipe (Dairy-Free + Classic Versions Both Tested)
Alright fam — I'm going to tell you about the dessert that made Anaya forget she doesn't like "gooey things." She took one bite of this chocolate lava cake, went completely silent for three seconds, and then said, "Can I have another one?" From my texture-sensitive five-year-old, that is the highest possible honour.
Alright fam — I’m going to tell you about the dessert that made Anaya forget she doesn’t like “gooey things.” She took one bite of this chocolate lava cake, went completely silent for three seconds, and then said, “Can I have another one?” From my texture-sensitive five-year-old, that is the highest possible honour. I’ve been making this chocolate lava cake recipe on repeat ever since.
I’ll be honest with you — I sat on this one for a while because I wanted to get the dairy-free version absolutely right before I posted it. Meera’s dairy sensitivity means I don’t put anything on this blog that I haven’t tested both ways: once with butter and dark chocolate, and once with coconut oil and dairy-free chocolate. The dairy-free version is not a compromise. It is not “pretty good for dairy-free.” It is just good. Rich, molten, deeply chocolatey, and it collapses into that perfect lava centre every single time.
This recipe takes 15 minutes to prep and 12 minutes to bake. That’s it. You can make the batter ahead, stash it in the fridge, and bake individual cakes right when you need them — which means you can sit down for dinner and still pull off a restaurant-level dessert without missing the whole meal. Rohan has started requesting these for his birthday instead of a proper cake. Nani tasted one and raised both eyebrows, which in her vocabulary means “exceptional.” I’ll take it.
I’ve included the classic version, the dairy-free version, and notes on making it gluten-friendly too. Every version is kitchen-tested, kid-approved, and ready to make someone at your table very, very happy.
Ingredients
- 115g (4 oz) good-quality dark chocolate, roughly chopped — 70% cacao or higher (dairy-free swap: use certified dairy-free dark chocolate such as Enjoy Life or Camino brand; check label for shared-line allergens)
- 115g (½ cup) unsalted butter, cubed (dairy-free swap: use refined coconut oil, same quantity — refined so there’s no coconut flavour)
- 2 large eggs, room temperature
- 2 large egg yolks, room temperature
- 90g (¾ cup) icing sugar, sifted
- 30g (¼ cup) all-purpose flour (gluten-friendly swap: use a 1:1 gluten-free flour blend such as Bob’s Red Mill — texture tested and approved)
- 1 tsp pure vanilla extract
- ¼ tsp fine sea salt
- Softened butter or coconut oil for greasing the ramekins
- 2 tsp cocoa powder for dusting the ramekins
Instructions
-
- Preheat your oven to 220°C (425°F). Place a baking sheet on the middle rack while the oven heats — you’ll bake the ramekins on this. Grease four 175ml (6 oz) ramekins generously with softened butter or coconut oil, making sure you coat the sides and the bottom completely. Dust each ramekin with cocoa powder, tap out the excess, and set aside.
-
- Melt your chocolate and butter together. You can do this in a heatproof bowl set over a pot of barely simmering water — don’t let the bowl touch the water — or in 20-second bursts in the microwave, stirring well between each burst. Either way, stir until completely smooth and glossy. Set aside to cool for 3-4 minutes. If you’re using coconut oil and dairy-free chocolate, the method is exactly the same.
-
- In a medium bowl, whisk together the eggs, egg yolks, and icing sugar vigorously for about 2 minutes. You want the mixture to turn pale and slightly thick — this is what gives the cakes their structure and that crisp outer shell. Don’t skip this step.
-
- Pour the slightly cooled chocolate mixture into the egg mixture and stir gently with a spatula until just combined. Add the vanilla extract and salt. Stir again.
-
- Sift the flour directly into the bowl and fold it in with a spatula using slow, deliberate strokes. Stop as soon as you can’t see dry flour — about 10-12 folds. Overmixing will tighten the batter and you’ll lose that molten centre. This is not the moment to be enthusiastic.
-
- Divide the batter evenly between your four prepared ramekins. At this point, you can cover them with cling wrap and refrigerate for up to 24 hours — perfect for a make-ahead dessert. If baking from the fridge, add 1-2 minutes to the bake time.
-
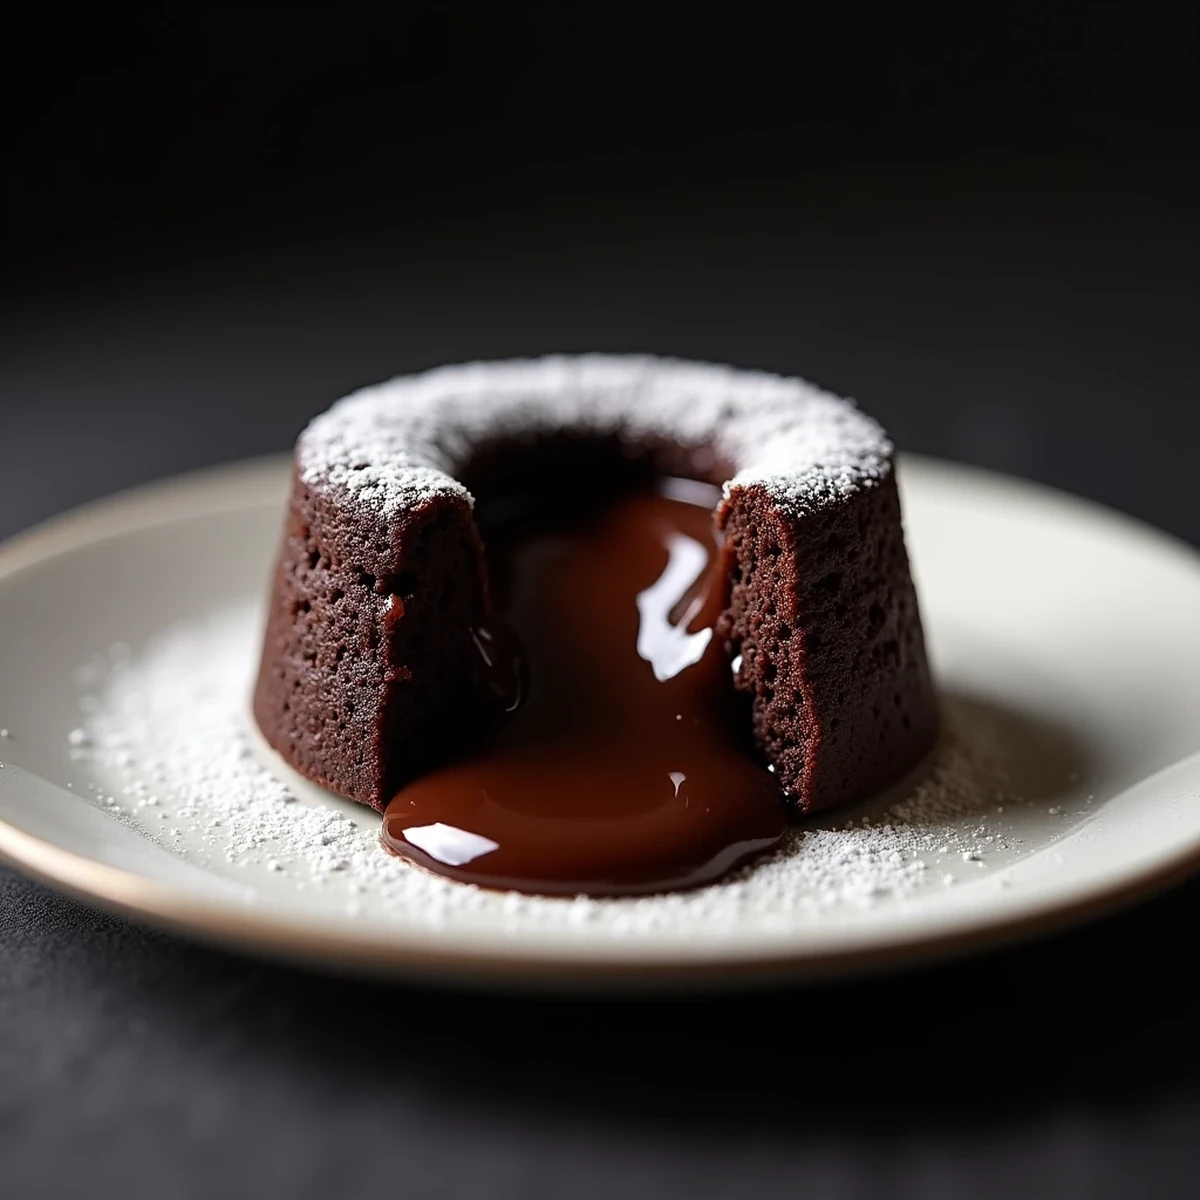
- Place the ramekins on the preheated baking sheet and bake for 11-12 minutes. The edges should be set and pulling slightly away from the sides — the surface will look matte rather than shiny — but the very centre should still have a visible jiggle when you shake the pan gently. That jiggle is your lava. Do not overbake. Set a timer and trust it.
-
- Remove from the oven and let the ramekins sit for exactly 1 minute — no more, no less. Run a thin knife or offset spatula around the inside edge of each ramekin. Place a small plate face-down on top of each ramekin, then flip it in one confident motion. Lift the ramekin slowly. The cake should release cleanly.
-
- Serve immediately. Dust with icing sugar if you like, add a scoop of vanilla ice cream or dairy-free coconut ice cream alongside, and get that thing to the table while it’s still molten. This is a no-waiting situation.
Nutrition
Tips
Before you bake — a few things that’ll save you from heartbreak:
1. Your chocolate quality is doing most of the work here. This is a short ingredient list, which means every single one counts. Use the best dark chocolate you can find — I look for 70% cacao minimum. I pick mine up at the South Asian grocery on Hurontario where they stock Camino bars for about $4, which is half the price of the same quality at a chain store. For the dairy-free version, Enjoy Life Semi-Sweet Chocolate Mini Chips or bars are our household staple — they’re certified free from the top 14 allergens and I’ve never had a bad batch. Always check the label — formulations can change.
2. The jiggle test is your best friend. At 11 minutes, pull that tray and shake it gently. You want the outer inch or so to be set — no liquid movement there — but the centre should wobble like a very relaxed jelly. If the whole surface jiggles, give it another minute. If nothing jiggles at all, your lava has set and you have a very good individual chocolate cake — still delicious, still not a disaster, just not lava. Every oven is different, so bake one as a test the first time and get to know your oven’s sweet spot.
3. Ramekin prep is not optional. The grease-and-cocoa step is what lets the cake release cleanly without tearing. Be thorough — get every millimetre of the sides and the bottom. I do two layers of butter and then a generous dusting of cocoa. If you run out of ramekins, oven-safe teacups or deep muffin tins will work in a pinch, but watch the bake time — shallower vessels cook faster.